Pages

Tuesday, May 27, 2014

Pump Toolbox Build

Ok, time for the first real post. Last week I started ordering parts for my pump toolbox. It's been a year and a half or so since I started brewing, so I wanted to take my brewing to the next level. I got some other pieces of equipment, but this is just gonna focus on the pump and the build.

The pump I got was the stainless chugger pump.


Next, the toolbox. This was just a random toolbox that was the right size for what I was looking for. I could have gone with something smaller but I wanted it to hold the majority of my brew day stuff so I can decrease the amount of space all my stuff was taking up.


As you can see, the side (where the pump head will sit) is not completely flat. However, the flat part in the center is just big enough for the pump head and housing to sit flat on.

Next, I took a 1x4 and mounted the pump on it. This serves two purposes. One, if I want to change the orientation of the head, without it hitting the ground, I can. Two, if I want to add a bend for a priming valve of something of the like I can without issue. Added bonus, not scraping my knuckles on the ground attaching the quick disconnects.


Next, I sat the mounted pump inside the box and marked the location I needed for the magnetic drive to pass through.


After marking the hole I chose a 2" hole saw to get the job done. The magnetic drive was just shy of two inches but the housing attached to the outside will seal that up.


The hole saw made quick work of the plastic, and I was ready to go. The rough looking edges are from me sanding the extra plastic off and making everything nice and smooth.


After that I put the drive through the hole and set it where I wanted it permanently mounted. Made some quick markings and drilled the appropriate holes out with a step bit. I made them bigger than necessary to easily accommodate the mounting screws without too much fuss. Put the pump back inside, screwed everything back together and voila!


As you can see I got a little ambitious with the step bit. I just covered that up with a bit of electrical tape, good to go! After that, I hooked my pump up to my 3 prong outdoor weather resistant remote control and plugged that into my extension cord with my gfci plug (not shown, picking it up today!)


The remote makes it super easy to turn the pump on and off without having to even touch it. Although, I cannot take credit for this idea. I found this amazing tip from my favorite brewing resource Homebrewtalk. Really works well.

Done! This pump box is amazing here is a shot of it in action and me determining my system losses.


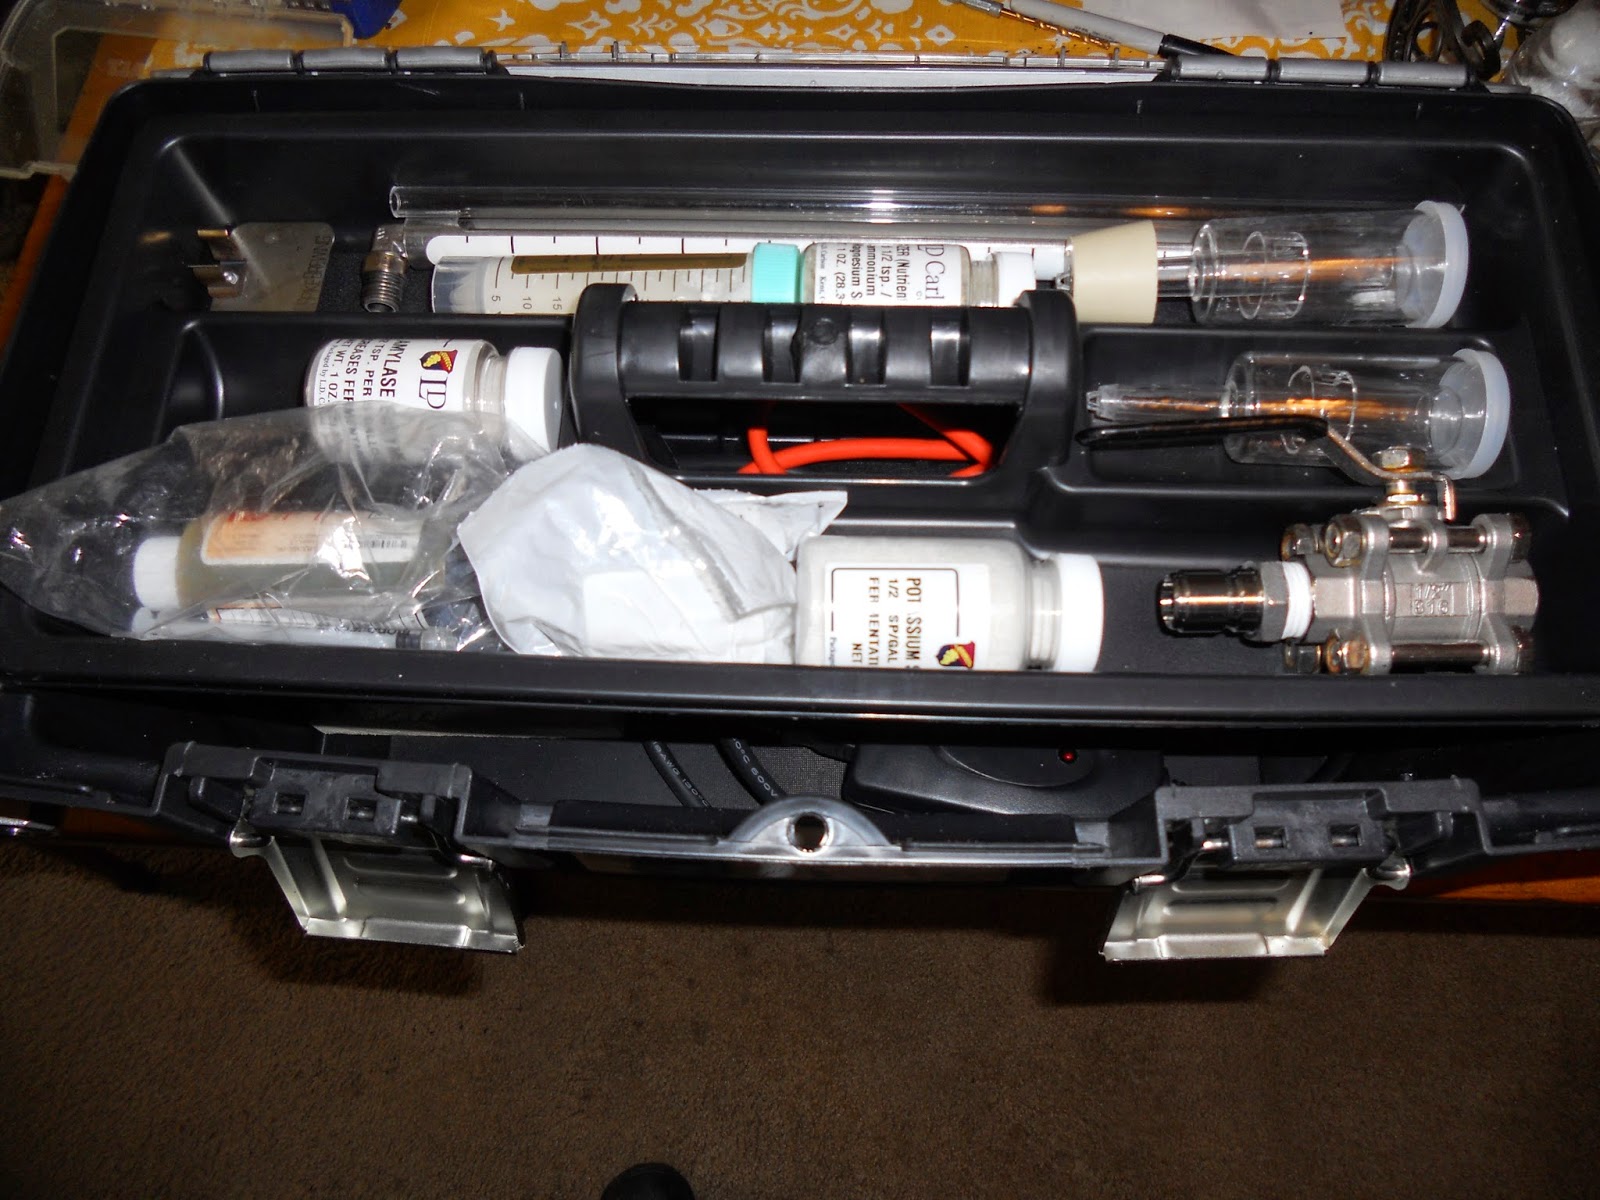
As you can see it holds just about all of the small stuff I need for my brew day. As well as some other things I didn't expect. All in all it was well worth the effort. Testing performed flawlessly. All ready for my quick disconnects. Can't wait to use it. 

Thanks for your patience on the first real post, and thank you even more for visiting my blog!

Cheers!

Whew!

Just got back from vacation in KY doing the bourbon trail. Anyone who hasn't gone should really give it a shot. It's really fun and KY is a great state.

I found a surprising amount of craft beer there. Country Boy was by far my favorite. The brewers were very nice and took me around their setup. They make a lot of great beers to boot! West Sixth and a couple others were great too, but Country Boy took the cake. If you're in the area be sure to check them out!

Next up is my write up on building a pump toolbox. I will be posting this later today. finally got it finished and tested this morning. It works even better than I expected. Stay tuned, it'll be up in the next few hours, the gym is calling me!

Cheers!

Tuesday, May 20, 2014

Thanks!

Thank you to everyone who has recently visited the blog after my write up on homebrewtalk. There will be plenty more to come soon! Recipes, techniques etc. Doing a Dogfish Head 120 minute clone here in a few weeks that will be very detailed. Also have 2 beers in the fermentor that are about ready for carbing and tasting. Stay tuned!

Glass or Plastic. Which Big Mouth Bubbler is for you?

Since writing my last article I have had the pleasure of using the Plastic BMB a few times. After a lot of thought on comparing the glass versus plastic I think I have a good idea on which I prefer, why I feel this way, and the pros and cons of both.

First, I will start off with the glass BMB.

Glass Pros:
  • Zero air permeation, just like any glass carboy
  • No chance of carryover taste from batch to batch
  • Nice harness makes moving and pouring a lot easier than traditional brew haulers
  • Can last a life time with proper care
Glass Cons:
  • Fragile
  • Defects in the glass
  • Lid cannot accommodate any sort of siphon or thief
  • Difficult to rest siphon hands free
  • Heavier than plastic, 6.5 gallon weighs 16lbs empty! That's about equal to carrying 2 extra gallons of beer.
  • Potential need for replacement gaskets. Although rare it can still be a potential recurring cost.

As you can see there are more cons than pros in my eyes. I do love to use glass, but I have some concerns with these fermentors in particular. The imperfections in the glass concern me, I constantly find myself checking for stress cracks around the defects.


As a primary I see no need to go with the glass version over plastic. Keeping oxygen out at this stage is very easy, and air permeation isn't really an issue. The lack of ability to siphon with the lid on is really off putting after using the plastic BMBs. Not having a punted bottom for the siphon to rest on doesn't help either. You may not notice a difference having never had these features, but I am having a hard time going back.

However, as a secondary, the glass version still proves invaluable. I make a lot of beers that benefit from long term aging. I know that the air permeation of PET plastic is supposed to be very low, but it isn't non existent. Either way, I trust glass, or a keg, for long term aging.

Also, something to consider is the size of both.


These are the 6.5 gallon sizes. As you can see, the plastic version is noticeably taller than it's glass counterpart. Plastic coming in at 23 inches and glass coming in at 17.5 inches. The 5 gallon versions have similar differences. Plastic coming in at 22 inches and the glass coming in at 16 inches. All of these measurements do not include airlocks of course. Something to consider along with your fermentation chamber size before you purchase either one. That being said the 10 inch footprint of the plastic is significantly smaller than the glass at almost 18 inches.

Now on to plastic. Not being a fan of buckets, I never thought I would like plastic so much.

Plastic Pros:
  • Super light (4lbs for the 6.5 gallon)
  • Dual port lid (optional)
  • Punted bottom
  • Volume markings
  • Much easier racking
Plastic Cons:
  • Same flexing problem as other plastic carboys
  • Lid ring seems to work itself off unless tightened down very hard
  • Texture on the anti-flex ribs like to hold onto trub when cleaning
  • Air permeation

Biased or not, I definitely feel there are more pros than cons to the plastic version. As long as you aren't doing any long term aging, you can't go wrong with the plastic version of the Big Mouths.

The biggest advantage in my opinion is a combination of the dual port lid and the punted bottom. I'll start with the former.


The dual port lid is amazing. I like taking samples as my beer ferments, and while it's conditioning. I have all but permanently stored the single port lid. Being able to sample and rack without removing the lid is easily my favorite feature. No siphon clamp needed. That in combination with the punted bottom really takes the ease of use to a whole other level.


The punted bottom is also amazing. I always attach my tubing to the racking cane after I put the siphon into the wort. So, I will put the auto siphon together, and find the punted bottom and just let the siphon rest in that indent, while I attach the tubing and proceed to siphon. Can't get much easier.


As you can see, there isn't much left after siphoning. I got this much out of it and did not move the siphon an inch. However I do see a potential issue with this, maybe with low hop lower gravity beers. I had plenty of trub in this beer, so I only lost about 1/8 of a gallon. If there were less trub I could see you potentially losing up to ¼ of a gallon.

All that being said, I still would refrain from aging anything long term in these. PET plastic is supposedly still air permeable. Although it may be to a lesser degree, I still wouldn't risk it on a brew I intend to age in the fermentor.

I don't know if I would say one is better than the other. I prefer each for specific purposes. However, I will help you make the best decision for your specific needs or situation.

Reasons to consider plastic
  • Much lighter, at only 4lbs for the 6.5 gallon
  • Smaller footprint, if that is valuable in your fermentation setup
  • Dual ported lid makes just about everything easier
  • Punted bottom in conjunction with the lid is amazing
  • Virtually indestructible

Reasons to consider glass
  • Does not permeate air
  • Preferred material for long term aging
  • Short in stature, if that is valuable in your fermentation setup
  • Lasts a lifetime
Taking all this into consideration, I hope I have helped you decide which is best for you. I have used both, and would say without a doubt both are great buys. The ability to reach your arm inside the carboy and clean is revolutionary. I love them both and wouldn't turn either down. I got all of mine from Northern Brewer, they have always been great to me and the flat rate shipping is awesome.

Thanks for reading. Cheers!

Monday, May 19, 2014

It's finally here, the Plastic Big Mouth Bubbler!

A couple of months ago, the Glass Big Mouth Bubbler was released. I was so excited that I sold off my glass carboys and purchased a pair of them immediately. I was, and still am, enamored with these things. The ability to stick your entire arm down into your carboy not only makes cleaning faster, but much easier.

However, I found myself wondering what it would be like if a plastic version of these were to be produced. Low and behold, not even a month later my dreams came true. The Plastic Big Mouth Bubbler was born!


At a glance, carboys are awesome! I have been using solely glass for so long, I forgot how light a fermentor can really be. They are nice and rigid as well. The first thing to catch my eye, and the most exciting part for me I think, was the lid.


The lids are made of HDPE material. I fully expected these lids to be kinda flimsy, not knowing anything about what HDPE was, but work nonetheless. Boy was I wrong, the lids are really solid. I have absolutely no fear of them breaking, or having an issue with screwing the ring down tightly to make a good seal.

Another thing I was worried about, how easy are the disc part of the lids to set? Is it just a smooth bottom that you have to get just right to screw it on? Nope! It has a really nice ridge right on the under side of it that lets you get it perfectly on the mouth of the bottle effortlessly.

Also noteworthy, no need for any gaskets. This lid seals perfectly without the need for any gaskets. Reducing any recurring cost, albeit a rare one.

My favorite thing about the lid? The dual ported option you can purchase.


This carboy is awesome. It will allow for so many options. Thermowell, taking gravity samples without removing the lid, etc. The lid is large enough to fit any siphon and thief that I own. Sampling is now a breeze.

Which brings me to my next point, the punted bottom.


I figured this would be a nice addition, but I did not anticipate how much I would actually fall in love with it. With either lid my 1/2” siphon sits in the punted bottom surprisingly securely. I carried it up the stairs to take this picture with the siphon inside and it didn't move an inch; resting in the indent perfectly.


Also, a side note. Other than some extreme hopping there is plenty of space around the indent for everything to fall, leaving you with crystal clear wort for your secondary.

Next is the harness. If you have been looking into the glass Big Mouth Bubbler, and loved the harness that came with it you are in luck. I am not sure if it is the exact same harness, but the similarities are obvious. It secures exactly the same, with added support around the neck for pouring (which I love). Much easier to tightly secure than the Brew Hauler. The harness is also made in the USA, which is an added bonus.

Last but not least. The volume markings. These were a really nice touch for those that don't have a sight glass on their kettle, or just want conformation. I have an accurate sight glass on my kettle so I don't really need this per se, but I found myself liking it being there just so I can double check my volumes. Would have been nicer if there were some numbers next to the markings, but I feel that is just me being nit picky.


All that being said there are some disadvantages still.

Flexing of the plastic. Yes this is still an issue, same as the previous PET bubblers. However, this does have 3 big anti-flex ribs. It helps, but it doesn't eliminate the problem. I have noticed the 5 gallon is significantly more rigid than the 6.5 gallon as well. I personally find this to be a minor problem, easily solved by using a solid stopper when moving the carboy.

Long term aging. It has been known for a long time that air permeates plastic. This PET plastic is better yes, but not immune. I find this problem solvable by aging any beer you're going to have in there a while in glass, or like me – in a keg if possible. I prefer to get a blanket of co2 on it anyway if dry hopping or other additions aren't a concern.

In summary, I find these new fermentors to be a great leap forward in portable, and affordable fermenting gear. They're light, almost invincible, and pretty cool looking to boot. If you're trying to decide between these and glass, keep an eye out for my next article. However, if you have your mind made up on the plastic version, you won't regret it!

I picked mine up from Northern Brewer. I got the 6.5 Gallon and the 5 Gallon. Their customer service has always been excellent to me, and with the flat rate shipping you really can't beat the price.

Keep an eye out for my next article where I will compare the glass vs plastic and hopefully help you decide which is best for you.


Cheers!

Wednesday, May 7, 2014

Articles

This is the link to an article I wrote for Homebrewtalk. It is the first article I ever wrote and what got me interested in blogging in the first place. People seemed to like it so I said hey, why not try it again?

I have since taken on the task of writing up two more. The first was about the new Glass big Mouth Bubblers everyone is talking about. Pros cons etc. This next one is going to be on the plastic version, which is awesome by the way. After that I will be comparing the two. See which is better for what type of situation etc.

I will post the articles here first as soon as I am done, so stay tuned!

Also, on a side note. Got a nice IPA experiment in the fermentor right now, keep an eye out for the recipe and tasting notes here in a couple weeks.

Tuesday, May 6, 2014

Intro

Hey my name is Steve. I started brewing about a year ago. I had heard about homebrewing for some time before then, but never had the opportunity to delve into it. Once a friend of mine got a brewing kit as a gift and invited me over to brew with him.

Ever since then I have been hooked. It's only been about 18 months and I have moved to all grain, going to be purchasing some Blichmann kettles to start building my indoor electric brewery as soon as my wife and I find a home to purchase. God only knows how much cash I have dumped into this hobby, and it's only been 18 months!

Everyone loves my beer so far, so that really keeps me going and having fun with it. I drink plenty of the beer, but I'd say I give away at least 60% of it to friends because I like brewing it just as much as I like drinking it.

Gonna be taking the dive into building a fermentation chamber here before too long, and after that comes deciding on a better chilling option than an immersion chiller. Really tired of waiting 30 mins for my wort to cool!

Will post back soon with updates!